All the time I am asked “How tall should I make my bridge?” This article will attempt to answer this question by illustrating a principle in model bridge building. There is no cut and dry answer, as you should evaluate your bridge specifications and guidelines and conduct experiments to reach the best answer for you.
How Changing Height Affects a Bridge

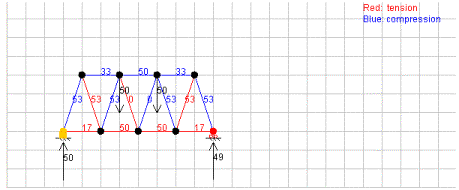
This is our control bridge. The bridge is 8 inches long and 3 inches tall. I have added two load points with a total load of 100. This means the numbers you see act as percentages. For instance, the very middle of the top chord of the bridge is supporting 50% of the total load.
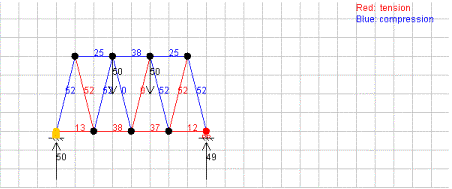
Now I will show you another bridge, with the same design. The only difference is that this bridge is 4 inches tall, one inch taller than before.

You can see in this second bridge that the middle section of the top chord is only holding 38% of the total load. All I did is increase the height of the bridge by one inch.
What does this mean to you?
As you saw in the example bridges, by increasing the height of the bridge you decrease the load on the top (and bottom) chord. A decrease in load means you can make it smaller. Smaller means lighter in this case. However, there is a catch.
Look back at the two examples. By increasing the height, the load decreased on the top and bottom chords but remained the same on the middle “truss members”. Why is this a drawback? By increasing the height, the middle members have to become longer. That inherently adds weight. However, bridge builders have another problem when pieces become longer. The amount a piece of wood can support in compression before buckling decreases with length. So that means the middle members will have to be made stronger the taller the bridge is. Adding strength usually means adding weight.


So we have a draw
By increasing the height of a bridge, you can make the top and bottom chords lighter. But at the same time, the middle truss members have to be made heavier. The goal is to find a balance. I believe that there is an optimal height for a model bridge in every situation. The trick is to find that height, by balancing out these two factors. I was once told that the optimal height for an arch bridge is 1/6th the length of the span. That means if your bridge is 6 inches long, it should be 1 inch tall. My experience has confirmed that this is a very good starting place for an arch bridge. And I believe the same ratio of height to length can be applied to regular truss bridges.
The Optimal Height
Interestingly, the Golden Gate Bridge uses the 1/6th ratio almost exactly. Perhaps you can do some studying on other real bridges and see if they follow this idea also.
Data taken from the Bridge Designer.

would you say a 45:12 (7.5:2) ratio is bad or good?
Your bridge is 45 units long and 12 units tall? That sounds pretty reasonable.
so if my bridge is 24″ long it should be 3″ tall?
hi,,,,
sorry to say he defined the 6:1 rather 8:1
so ur bridge height should be 4 units
That is a 8:1 ratio. A good place to start is 6:1. If you know what you are doing, you can change the length to weight ratio. As long as you understand the material on this page, feel free to experiment at getting the best efficiency for your design.
Thanks for the info!! I am doing a science fair project testing how much weight different bridge truss hold. Thanks again!!
A truss has an optimal load distribution when it has an aspect ratio near 2:1 I believe. I really cannot find anything in any of my statics or strengths textbooks, nor can I find any real information to prove this. The title of this section should be “Aspect Ratio” becuase this is what it is called.
I also found all of your information to be the case when I designed my first truss a few years ago. Taller trusses just hold more, yet the trade-off comes in the form of increased material requirements. This is where the optimization gets a bit tricky. And there should be a way to calculate the efficiency of a truss based on the style of truss, and the aspect ratio.
But, again, I cannot find any solid evidence to point anyone to on how this works, other than that it is simple geometry. Anyone that knows the method of joints understands why increasing the height works.
Never try to build a truss with an aspect ratio of 20:1 or higher, unless you want unrealistic deflections. I am having an issue with this now, designing trusses in ANSYS with an aspect ratio of 28:1, for my given deflection specification of 1/180th of the span maximum, I am finding I need a cross sectional area of steel to be around 250in^2, thats basically a large steel beam. with at least a 16inx16in square solid cross section. Just impossible to make efficient.
Hi, i am building a spaghetti bridge for an extra credit assignment. it must span 30 cm, and be under 250 grams. i think that 250 grams is a ridiculous amount of weight for a bridge that long, but the bridge that holds the most weight receives 5 more extra credit points than teh other bridges. there is also a “most efficient” bonus of 5 points, however, if you bridge is like 8 grams, but only holds 2 pounds, you may end up with the same amount as a student who used like 250 grams, and held 5 pounds. do you think i should just make amazingly heavy members, or make a balanced efficiency bridge? if i made a balanced efficiency bridge should i make it maybe a warren that’s twice as high? im liking the warren design right now.
You are right, 250 grams is extremely heavy for a balsa wood 30cm long bridge. However, you are building a spaghetti bridge, which is different. If I were you, I would try and use up most of those 250 grams and go for both the extra credit points. You can build a bridge that not only holds the most, but is also the most efficient. I have not had a lot of experience with spaghetti bridges, so I don’t have any photos on this site to share with you. But you can google for some photos to kind of get an idea of what people have done in the past. And if you feel like it, I would love for you to submit some photos of your bridge when it is done.
i’ll try to remember, to take some pictures. thanks!
ok, um, you may have already put this on here, but making the bridge taller also makes it more likely to fall over.
l8r 🙂
Granted. Making a bridge taller can make it more unstable. However, this can easily be remedied by adding diagonal bracing from the top to the bottom of the bridge.
How many mm tall is the first figure under the heading Optimal Height?
I am building a beam(of Popsicle sticks) 1000mm long with 100cm squared c/s area. Even though this sight is devoted to bridges, I found invaluable information from this website. Great work
Thanks for the post. I have a backyard project that needs a 25 foot bridge. (mostly decorative, but would be embarrasing to have it collapse) The math is what I was lacking.
the post on Bridge Height tackles the load distribution in rising the bridge. You talk about the bridge in terms of total length versus total height. But what about how many diagonals are necessary for a given lenght? Or how low can the angle of these diagonals be? (the less diagonals, the less material necessary)
The sketches are backwards, the information in them needs to be swapped. (just incase anyone gets confused at first glance…)
The sketches do not need to be switched. They are exactly as I want them.
This was helpful.
how tall would the bridges over ct. highways have to be to have the electronic tolls placed. It
appears that the gantries are higher than the bridges on the mass pike. thanks Jay
Thank you for discussing bridge height, this was very helpful for my school project. I am soon able to begin my initial sketch and 3D model but I have one question first. Is there an optimal width for a bridge or does that factor not matter? Thank you!
This depends a lot on intended usage.
I am making a balsa wood warren truss bridge. It has to be 12 in. long, so I would make it 2 in. tall??
That’s a good place to start.